Heart-Shaped Chocolate Hand Pies | Valentine’s Day Recipe
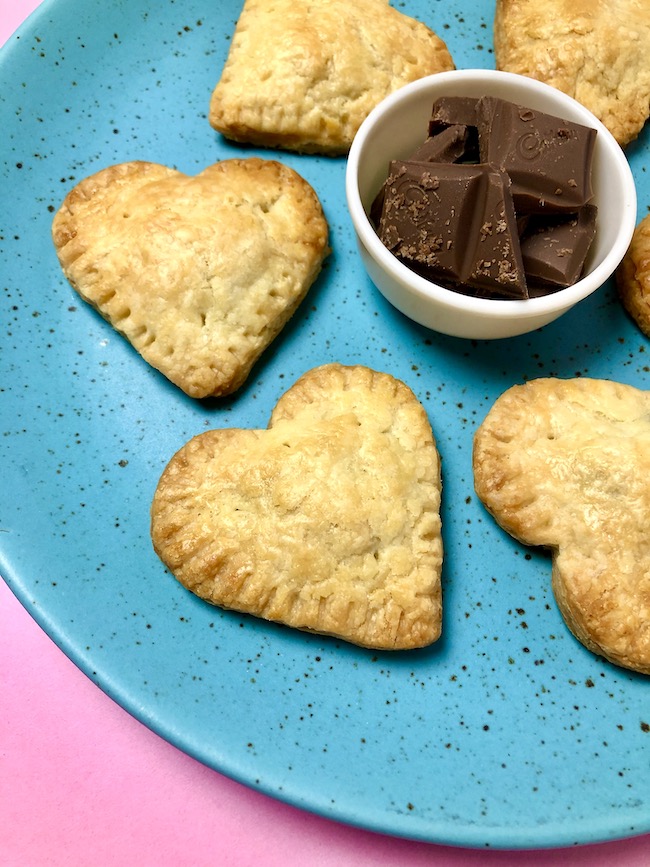
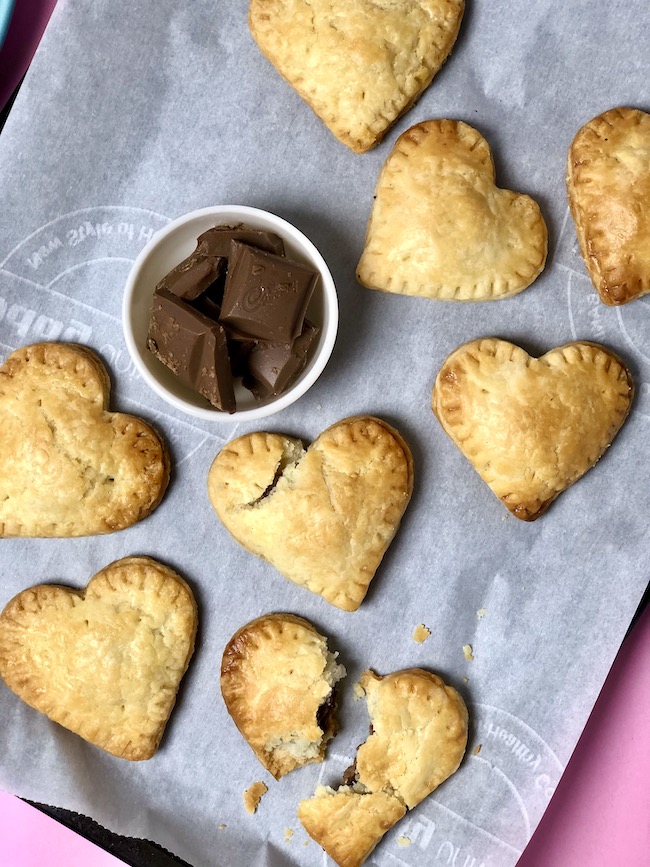
So are you planning to cook for someone special this Valentine’s Day? Try these delicious heart-shaped chocolate hand pies which are filled with Cadbury Dairy Milk Chocolate. These pies have a buttery flaky texture and a soft chocolatey centre. This will definitely win over anyone’s heart.
About the pie crust
This hand pie has an all-butter pie crust. It is made with flour, butter and sugar. Here I have used salted butter. You can also use unsalted butter. In that case, don’t forget to add a little salt into the dough. And when you are making the pies, always make sure the dough remains cold at all times. If it becomes warm them place it in the refrigerator for a few minutes.
About the pie filling
Here I have filled the pies with chocolate but you can add any filling of your choice. Like Nutella, chocolate ganache, jam etc.
About the milk wash
I have not brushed the pies with egg. Instead of that, I have used milk. It helps in giving the pies a beautiful light golden colour. Hence it is completely vegetarian.
These adorable chocolate pies are the perfect treat for Cupid’s big day. So don’t wait. Make them now!
Watch the recipe video here:
If you liked this video then subscribe to my YouTube channel. And don’t forget to hit the bell icon so you’ll know whenever there is a new video.
Prep Time: 1 hr | Bake Time: 20 min | Total Time: 1 hr 20 min
Rest Time: 1 hr
Note: I have baked these pies in an OTG. It took 20 minutes to bake one batch (6 pies) of pies. If you are using a different oven then the time may differ.
Serves: 24 hand pies (2.5-inch pie)
Ingredients:
- 2 ½ cups all-purpose flour
- 2 tsp powdered or icing sugar
- 226g salted butter, frozen
- 7-8 tbsp ice water
- Cadbury dairy milk chocolate, as required
Baking Directions:
To make the hand pie dough:
- Take a plate and using a grater, grate the frozen butter over it. Then keep the plate in the freezer.
- Take a large bowl. Add all-purpose flour and powdered/icing sugar. Give it a good whisk.
- Note: If you are using unsalted butter, then add a little salt to the flour mixture.
- Then take the grated butter out of the freezer and add it to the flour mixture in batches. After adding the first batch, give it a good whisk. Make sure there are no large clumps of butter. Keep adding butter in small quantities and mix it as you go.
- After mixing all the butter, pour ice water into the mixture, one tablespoon at a time. Using a spatula, mix it well. Avoid adding too much water. The mixture should be shaggy, which means, it should be well mixed yet have a few lumps. There should not be any dry flour and the dough should not be smooth.
- To check that, take a little mixture in your palm and squeeze it. If it holds together and there is no dry flour on your palm, then the dough is ready.
- Place a silicone rolling mat over the kitchen counter. Line it with cling wrap/film.
- Pour half of the mixture over the cling wrap. Then with the help of the wrap, bring the dough together by compressing it from all the sides. Watch the recipe video to see how it’s done.
- The dough should not be smooth and may look a little crumbly around the sides.
- Note: Remember you don’t have to knead the dough but just bring it together so that it forms an uneven ball.
- Once it comes together, wrap the dough nicely with the same plastic wrap and pat it.
- Then flip the wrapped dough so that the seam side is facing down. With the help of a rolling pin, gently roll the dough inside the wrap. This will help in compressing the dough and making it more cohesive.
- Keep this dough in the fridge for at least 1 hour. Wrap the remaining flour mixture in the same manner. And keep it in the fridge as well.
- Note: You should chill the pie dough for at least 1 hour and you can store it in the refrigerator for up to 3 days.
To make the heart-shaped chocolate hand pies:
- After 1 hour, take the dough out of the refrigerator. Place it over the kitchen counter and let it stay undisturbed for around 5 minutes so that it warms up a little. This will prevent the dough from cracking.
- Note: The dough will crack around the edges a little while you are rolling it. But don’t worry, pinch the cracks and keep rolling it.
- Unwrap the dough. Lightly dust the rolling mat, rolling pin and the top of the dough with flour. Avoid adding too much flour, as it can make the dough dry.
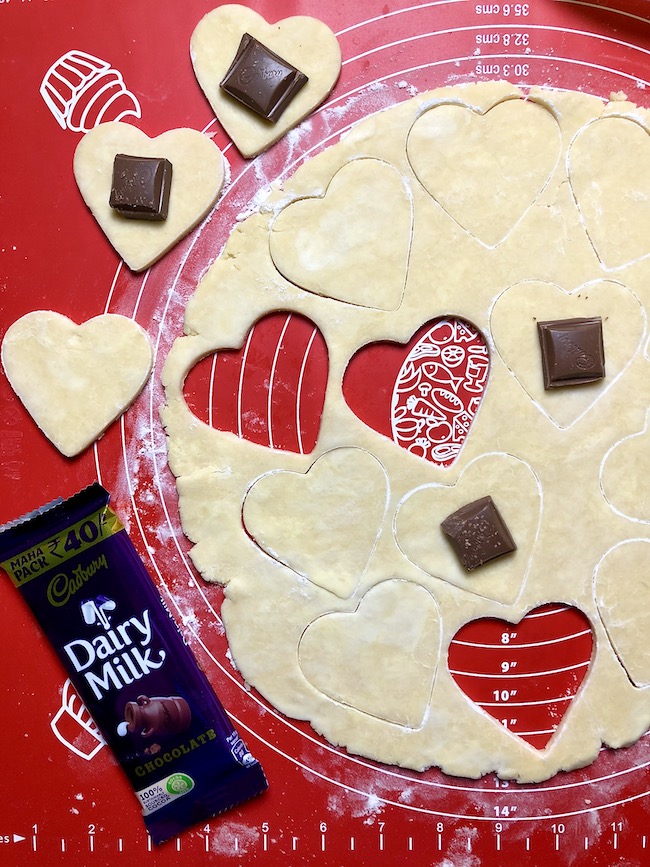
- Then roll it out into a 12-inch circle which should be about 1/4th inch thick. Try to roll it evenly and keep rotating it, so that it doesn’t stick to the mat.
- If the dough cracks then just pinch the crack and continue rolling it.
- Dip a heart-shaped cookie cutter in flour and cut into heart shapes.
- Gather the scraps and form a ball. Wrap it with the same cling wrap. Refrigerate it meanwhile you are making the pies. Re-roll it later on.
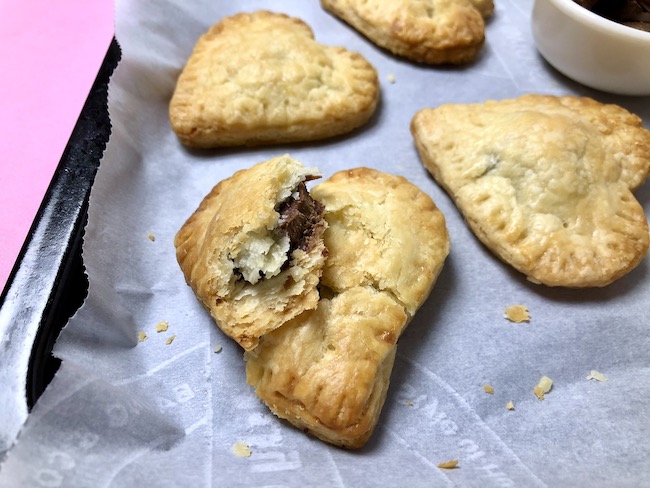
- For the pie filling, I have used Cadbury Dairy Milk Chocolate. But you can take any other chocolate of your choice.
- Add the chocolate pieces over the hearts. Brush the edges with milk. Top with another heart-shaped dough.
- Seal the edges nicely. Make sure there are no cracks over the pies. Otherwise, they might break while baking.
- Crimp the edges with a fork. Then cut a few slits on the top of all the pies.
- Brush them with milk. Now you can bake them right away. But I like to keep them in the refrigerator for around 15 minutes. During this time I will preheat the oven and make the rest of the pies.
- After 15 minutes, take the first batch of pies out of the refrigerator and keep the next batch inside the refrigerator.
- Place the first batch of pies inside the oven. Bake at 200-degree Celsius for 20-25 minutes or until golden in colour.
- Note: If you are not baking in a convection oven then rotate the tray halfway through baking.
- Take it out of the oven. Allow it to cool down for 5-10 minutes. Make the rest of the pies in the same manner.
- Serve it warm or at room temperature. Happy Valentine’s Day!
For more dessert recipes, click here.

Heart-Shaped Chocolate Hand Pies
Ingredients
- 2 ½ cups all-purpose flour
- 2 tsp powdered or icing sugar
- 226 g salted butter frozen
- 7-8 tbsp ice water
- Cadbury dairy milk chocolate as required
Instructions
To make the hand pie dough:
- Take a plate and using a grater, grate the frozen butter over it. Then keep the plate in the freezer.
- Take a large bowl. Add all-purpose flour and powdered/icing sugar. Give it a good whisk.
- Note: If you are using unsalted butter, then add a little salt to the flour mixture.
- Then take the grated butter out of the freezer and add it to the flour mixture in batches. After adding the first batch, give it a good whisk. Make sure there are no large clumps of butter. Keep adding butter in small quantities and mix it as you go.
- After mixing all the butter, pour ice water into the mixture, one tablespoon at a time. Using a spatula, mix it well. Avoid adding too much water. The mixture should be shaggy, which means, it should be well mixed yet have a few lumps. There should not be any dry flour and the dough should not be smooth.
- To check that, take a little mixture in your palm and squeeze it. If it holds together and there is no dry flour on your palm, then the dough is ready.
- Place a silicone rolling mat over the kitchen counter. Line it with cling wrap/film.
- Pour half of the mixture over the cling wrap. Then with the help of the wrap, bring the dough together by compressing it from all the sides. Watch the recipe video to see how it’s done.
- The dough should not be smooth and may look a little crumbly around the sides.
- Note: Remember you don’t have to knead the dough but just bring it together so that it forms an uneven ball.
- Once it comes together, wrap the dough nicely with the same plastic wrap and pat it.
- Then flip the wrapped dough so that the seam side is facing down. With the help of a rolling pin, gently roll the dough inside the wrap. This will help in compressing the dough and making it more cohesive.
- Keep this dough in the fridge for at least 1 hour. Wrap the remaining flour mixture in the same manner. And keep it in the fridge as well.
- Repeat the same process for the remaining mixture
- Note: You should chill the pie dough for at least 1 hour and you can store it in the refrigerator for up to 3 days.
To make the heart-shaped chocolate hand pies:
- After 1 hour, take the dough out of the refrigerator. Place it over the kitchen counter and let it stay undisturbed for around 5 minutes so that it warms up a little. This will prevent the dough from cracking.
- Note: The dough will crack around the edges a little while you are rolling it. But don’t worry, pinch the cracks and keep rolling it.
- Unwrap the dough. Lightly dust the rolling mat, rolling pin and the top of the dough with flour. Avoid adding too much flour, as it can make the dough dry.
- Then roll it out into a 12-inch circle which should be about 1/4th inch thick. Try to roll it evenly and keep rotating it, so that it doesn’t stick to the mat.
- If the dough cracks then just pinch the crack and continue rolling it.
- Dip a heart-shaped cookie cutter in flour and cut into heart shapes.
- Gather the scraps and form a ball. Wrap it with the same cling wrap. Refrigerate it meanwhile you are making the pies. Re-roll it later on.
- For the pie filling, I have used Cadbury Dairy Milk Chocolate. But you can take any other chocolate of your choice.
- Add the chocolate pieces over the hearts. Brush the edges with milk. Top with another heart-shaped dough.
- Seal the edges nicely. Make sure there are no cracks over the pies. Otherwise, they might break while baking.
- Crimp the edges with a fork. Then cut a few slits on the top of all the pies.
- Brush them with milk. Now you can bake them right away. But I like to keep them in the refrigerator for around 15 minutes. During this time I will preheat the oven and make the rest of the pies.
- After 15 minutes, take the first batch of pies out of the refrigerator and keep the next batch inside the refrigerator.
- Place the first batch of pies inside the oven. Bake at 200-degree Celsius for 20-25 minutes or until golden in colour.
- Note: If you are not baking in a convection oven then rotate the tray halfway through baking.
- Take it out of the oven. Allow it to cool down for 5-10 minutes. Make the rest of the pies in the same manner.
- Serve it warm or at room temperature.
If you do try this recipe, please share your experience with me by posting a picture of the dish using #temptingtreat and @temptingtreat on Instagram or you can also give your feedback in the comments section below.
Happy Cooking!

Grilled Cheese and Onion Sandwiches

You May Also Like
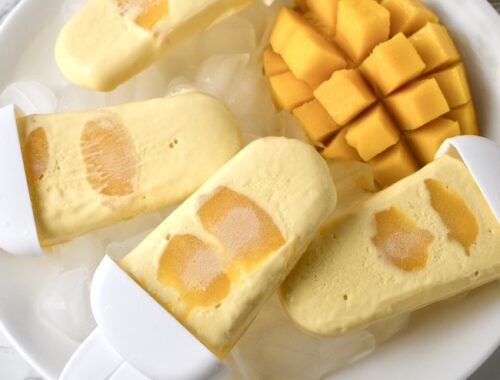
3-Ingredient Creamy Mango Popsicles and Ice Cream Made In a Blender
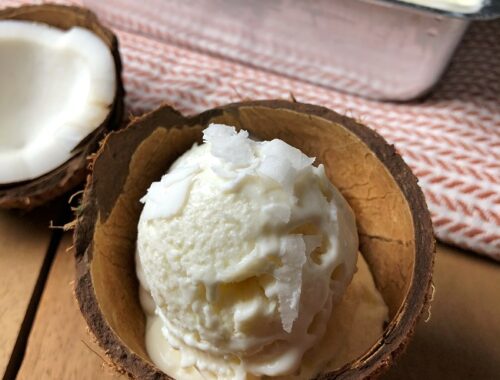
Coconut Ice Cream